A VLAN (virtual LAN), set up through VLAN configuration on the switch, splits one physical switch, or a group of switches, into several separate logical networks. Devices in the same VLAN behave as if they share a switch, even when they sit on different floors. Devices in different VLANs cannot talk directly; traffic between them must go through a router or Layer 3 switch.
This guide explains why VLANs matter. Then it walks through VLAN configuration on Cisco switches, from creating VLANs to setting up trunks.

Before and after VLANs
Without VLANs, every device on a switch shares one broadcast domain. A broadcast from one PC reaches all others, and anyone can see traffic meant for other teams.
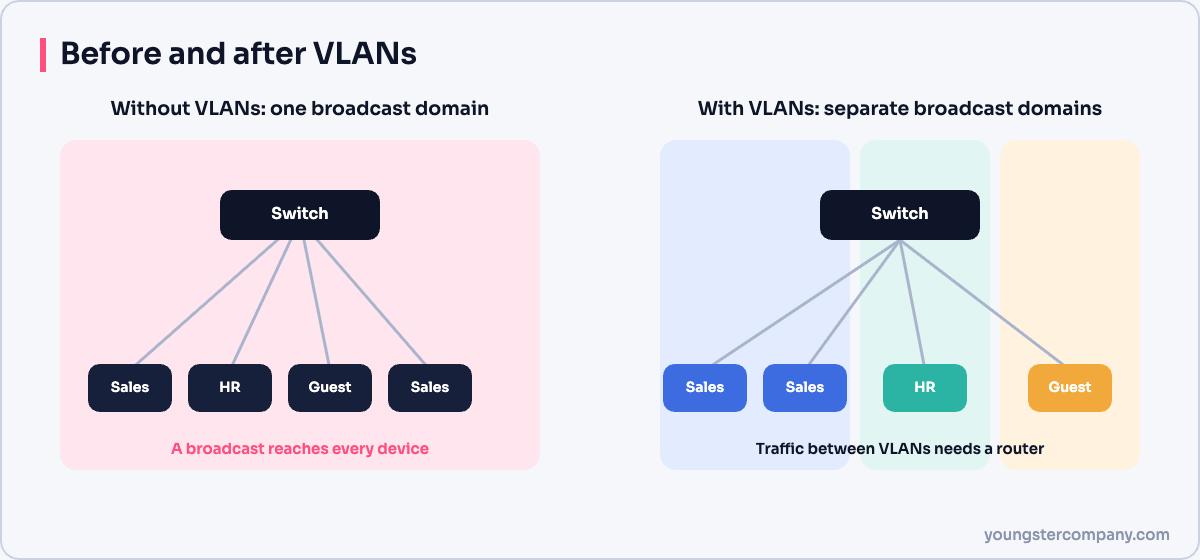
With VLANs, you group devices by function, such as Sales, HR or guest Wi-Fi, regardless of their physical location.
Benefits of VLANs
- Security: sensitive systems sit in their own VLAN, and ACLs or firewalls control access between VLANs.
- Performance: broadcasts stay within each VLAN, so there is less unnecessary traffic.
- Flexibility: moving a user to another team means changing a port setting, not recabling.
- Simpler management: you can apply policies, such as QoS, per VLAN.
- Cost: one switch can serve several logical networks.
Port types
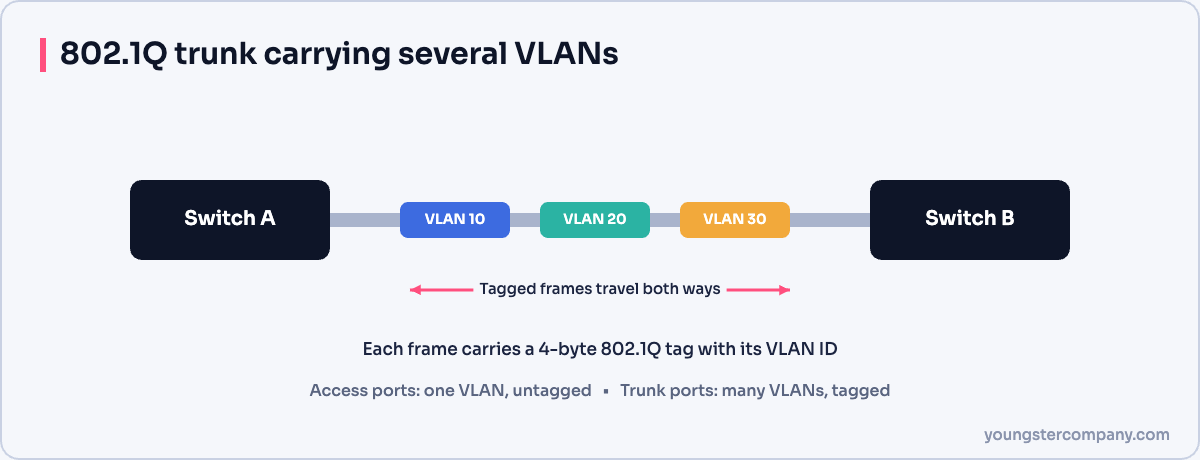
- Access port: belongs to one VLAN and connects end devices, such as PCs and printers. Frames leave the port untagged.
- Trunk port: carries many VLANs between switches, or to a router, using 802.1Q tags. Each frame carries a 4-byte tag with its VLAN ID.
Step-by-step VLAN configuration
In this example, VLAN 10 is Sales and VLAN 20 is HR.
1. Create the VLANs
Switch# configure terminal
Switch(config)# vlan 10
Switch(config-vlan)# name Sales
Switch(config-vlan)# vlan 20
Switch(config-vlan)# name HR
Switch(config-vlan)# exit
2. Assign access ports
Switch(config)# interface range GigabitEthernet0/1 - 12
Switch(config-if-range)# switchport mode access
Switch(config-if-range)# switchport access vlan 10
Switch(config-if-range)# exit
Switch(config)# interface range GigabitEthernet0/13 - 20
Switch(config-if-range)# switchport mode access
Switch(config-if-range)# switchport access vlan 20
3. Configure a trunk to another switch
Switch(config)# interface GigabitEthernet0/24
Switch(config-if)# switchport mode trunk
Switch(config-if)# switchport trunk allowed vlan 10,20
Switch(config-if)# switchport trunk native vlan 999
Switch(config-if)# switchport nonegotiate
Setting an unused native VLAN and disabling DTP negotiation reduces the risk of VLAN hopping attacks.
4. Save the configuration
Switch# copy running-config startup-configVerify the VLAN configuration
| Command | What it shows |
|---|---|
show vlan brief | VLANs and the access ports in each |
show interfaces trunk | Trunk ports, allowed VLANs and native VLAN |
show interfaces Gi0/1 switchport | Mode and VLAN of a single port |
Best practices
- Do not use VLAN 1 for user traffic or management.
- Put unused ports in an unused VLAN and shut them down.
- Allow only the VLANs each trunk needs.
- Use a dedicated management VLAN.
- Document VLAN numbers, names and subnets.
Next step: routing between VLANs
Hosts in different VLANs need a router or Layer 3 switch to communicate. Read our guide to inter-VLAN routing configuration. To share VLAN definitions across switches, see VLAN Trunking Protocol (VTP).
Sources
Need help with network security? We test routers, firewalls, ACLs and segmentation as part of our VAPT services and hardening audits. Contact us for a quote.